Honey, why does the house smell like Petrol?
Fixing Triumph fuel fittings that should have been
fixed before they left the drawing board
Ready for its closeup
Miss Gill's Speed Four in the studio of a local TV station, where they usually film their cooking segments.
We were there to promote Capital City Bikefest. |
The Triumph Speed Four is a little-known gem of a motorcycle based on the
fully-faired TT600 supersport.
But where the TT600 was released too early - it was the first digitally fuel-injected 600cc bike on the market
and suffered from poor fuel mapping and consequently horrible reviews - the
Speed Four came out after the issues were resolved and continued in the
Triumph lineup even after the Daytona 675 came out.
Triumph made little compromise with the Speed Four. Unlike many factory
streetfighters which substitute dirt-bike bars and other items, it keeps the
clip-on bars and high pegs of the donor bike. While there was some mild
de-tuning (a few less horses, a few more torques) Triumph truly hung a pair
of lights on a TT600 chassis, fashioned some missile-launcher intake tubes
to replace the ram air ducts on the fairing, and called it a day. In a 2008 Ride magazine
reader's poll, the Speed Four - then out of production - still beat the
Daytona 675 for handling and suspension. It was that good.
However, like many Triumphs, including the TT600, the Daytona 955,
Sprint 955 and others, it suffers from a design defect that is
inexcusable: it uses plastic "dry break" quick connectors to plug the
fuel lines to the gas tank.
You don't have to be an engineer to predict what is going to happen to
bits of plastic subjected to vibration and repeated heating and cooling
over time. It's going to harden, and it's going to crack. And when it is
the only thing standing between a tank full of petrol and a hot engine,
you have a very dangerous situation on your hands.

Sure, Derek, those'll hold up to years of heat and vibration
- the recalled fuel couplings. |
Triumph acknowledged half the problem, replacing the plastic male
fittings with metal ones for free as part of a recall. However, they
refused to replace the plastic female fittings under the tank. Sure, if
they failed while under warranty, you got more plastic fittings. If they
failed out of warranty, y'er on y'er own, mate.
Part of this is undoubtedly expense-related. Replacing the hose
couplings takes five minutes. Metal fittings are more expensive, and
replacing the tank fittings takes more like an hour and requires
draining the tank and a uttering lot of profanity, since they were
installed with an epoxy-like sealant that causes them to break off. More
on that in a minute.
The bottom line is that Triumph will not admit the problem. But there
shouldn't have been a problem in the first place. Even the most gormless
stoner sitting in the corner of a rural Kentucky high school shop class could tell you
that it would be better to use metal fittings, but this was designed by
engineers, who probably never took a shop class in their lives. Similar
issues often crop up, which makes me believe that those who design bikes
and cars have probably never held an actual wrench, although they may
have seen CAD drawings of one. That is why, when I am elected Dictator
for Life, no one shall be granted an engineering degree without spending
at least one semester getting their hands dirty in an actual repair
shop.
In the case of Miss Gill's Speed Four, the failure came to light due to
the odor of gas in the garage. This is not unusual, as there are several
bikes with manual fuel petcocks that have to be shut off, and sometimes
someone forgets to shut them off.
However, when the house itself began to smell of gasoline, we knew it
was a bigger issue. A sniff test singled out the bike, and
when the tank was unbolted, gas began dribbling out of the broken fitting.
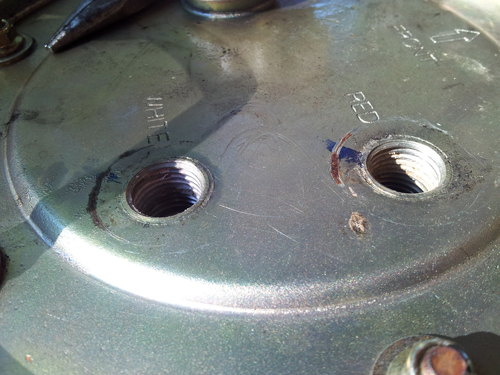
There's your problem.
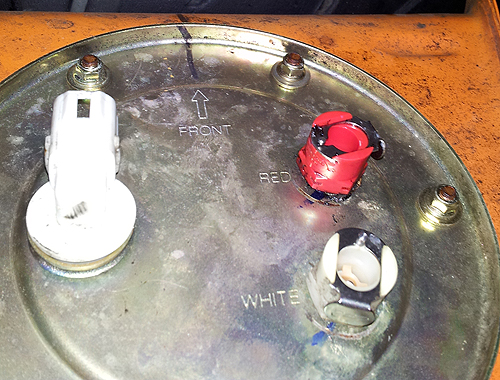
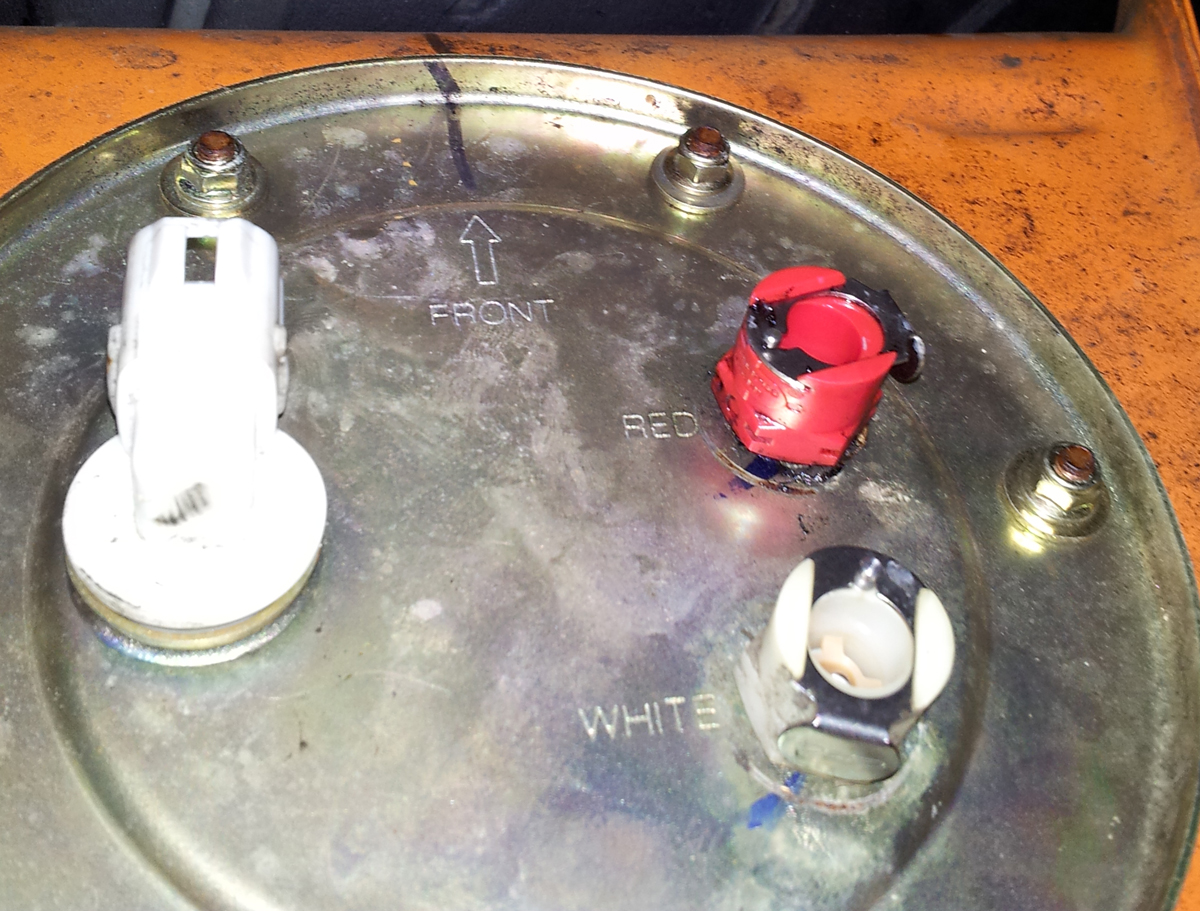
If you look closely, you'll see circular scratches on the plate around
the fittings on the right (the one on the left is the electrical
connection for the fuel pump). Apparently this is not the first time the
bike has had this problem. It probably got fixed under warranty. With
more plastic crap.
Step 1 is to drain the tank of fuel, which is a little difficult because
it will only dribble out of the broken connection. It's easier and
faster to open the filler cap and dump it. I have a plastic bin that I
use just for that purpose. Keep it clean and you can reuse the gas, or
put it in your lawn mower or car.
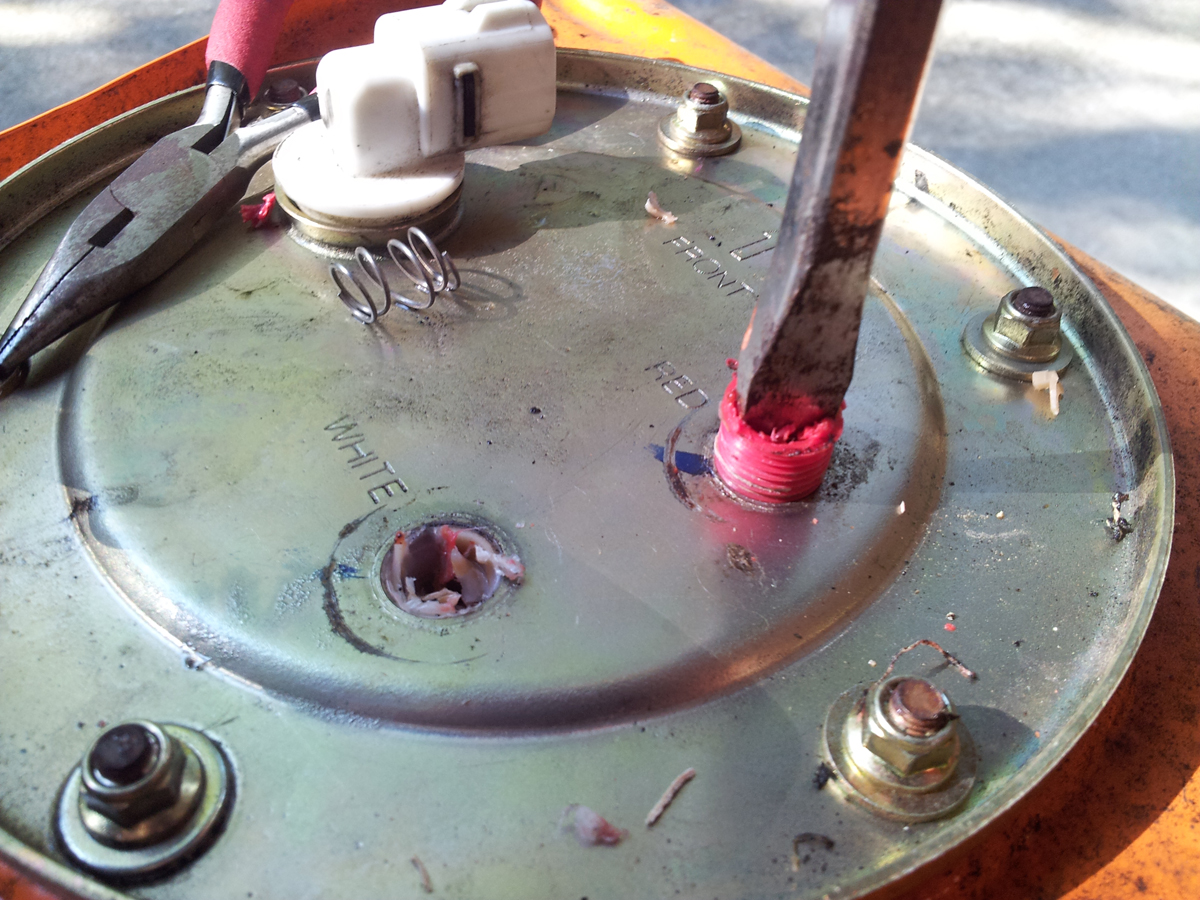
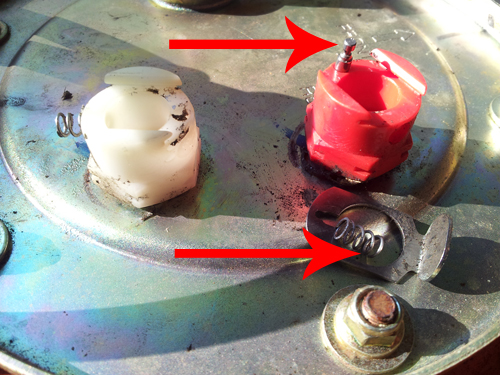
Next, you have to remove the locking hardware on the fittings by pushing down
on the little plunger and removing the sliding plate. There is a spring
on the side of the plate and one under the plunger - do not let them fly
out.
The reason for disassembly is so you can use a deep socket to remove the
fittings, rather than a wrench, reasoning that having six points of
contact will more evenly distribute the torque and make the fitting less
likely to break off.
The joke's on you! The fitting will break off anyway.

Seriously. Unless you are very lucky (and if the fittings do unscrew
without breaking, go buy a lottery ticket immediately!), the fittings
will break off flush with the base and you are now down the rabbit hole.
The next steps I describe may be somewhat controversial, as the
interwebs are already
full of stories by other
unfortunate owners who
have
fixed this very same problem (even though Triumph says there's no
problem). You must remove the threaded parts, but to do that, you must
remove the bits of valve left inside the threaded parts, and some of
those bits could potentially fall into the fuel pump assembly, which
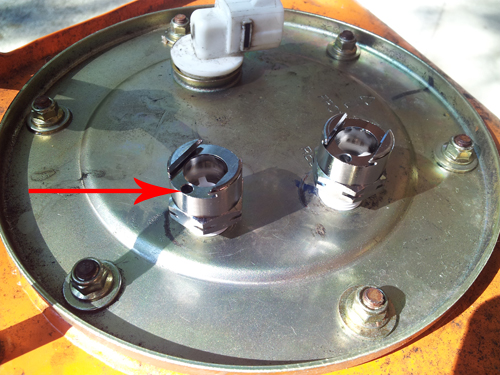
looks like this, from my TT600.
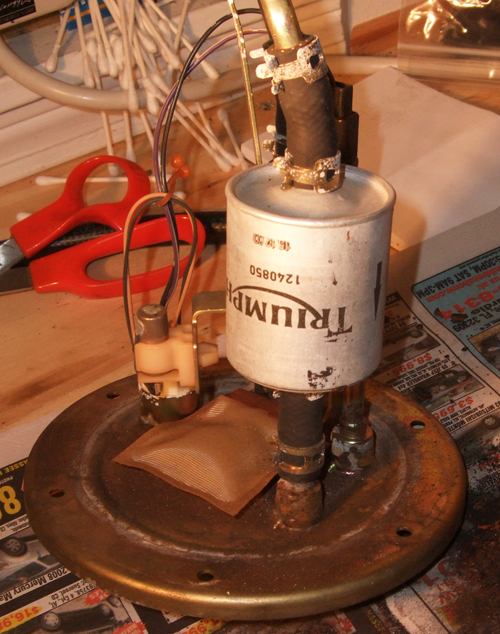
To get there, you must remove the assembly from the tank and disassemble
it, which will inevitably mean ordering new parts, especially the giant
o-ring that seals the whole thing when you reassemble. Unless you have
spare parts lying around, figure at least an extra week. Many owners do
this complete disassembly.
Or you could just start pulling bits out with pliers like I did, being
careful not to drop anything down the hole. I didn't. But it's a small
hole and the parts are fairly large - remember that this is actually a
valve made to stop up the hole when the fuel hose is disconnected, so of
course it is larger than the hole.
Once you get the valve out, you can use one of two methods to remove the
remaining fitting. I used both. The first involves taking a large
screwdriver and heating it with a torch - preferably away from the tank
and any residual fuel or fumes - then sticking it into the plastic
fitting, where it will melt two slots. Remove the screwdriver and let it
cool, then insert the screwdriver into the slots and carefully turn.
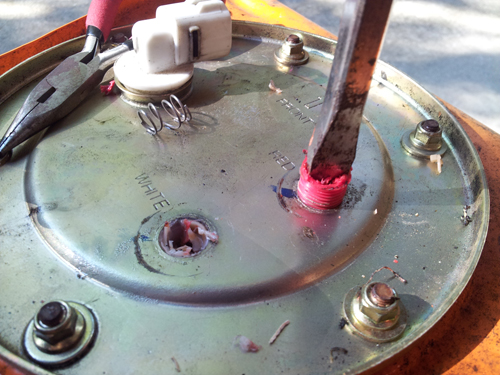
The other method is the tried-and-true ez-out. The fittings requre a
large one, and you'll probably have to buy it separately because most
sets do not include one large enough. I already had one, because I have
a TT600, which had the plastic fuel fittings, and you can guess the
rest. Anyway, gently tap the tool into the fitting until it grabs
sufficiently and then turn.

Once those are out, you are left with a bunch of crappy thread sealant
that needs to be cleaned out.
I used a small awl to scrape the threads clean. Since the bits of gunk
ARE smaller than the hole into the fuel pump assembly, I held a shop vac
over the thing while I scraped so that any dust and chunks were sucked up while I
cleaned, rather than falling down into the pump.
Once cleaned, it's time to insert the new fittings. These are not
standard hardware-store items. The problem with the plastic connectors
was so bad that Team
Triumph in Wisconsin actually went to the trouble of putting
together kits with metal connectors, but those are no longer available. I got mine online from
Quick Couplings.
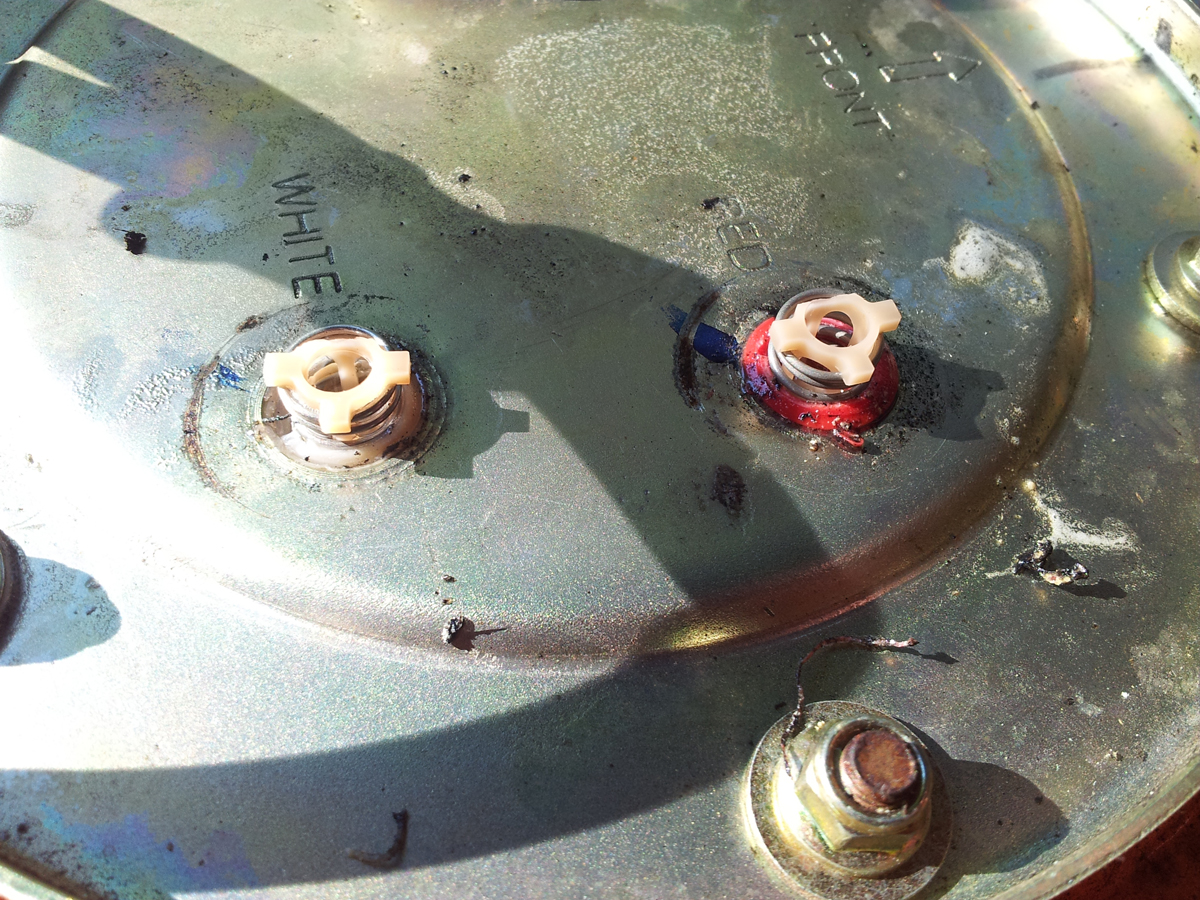
The tank fittings use 1/4" British Standard Pipe Taper (BSPT).
Here's more than you want to know about that. The hose fittings are
different sizes, because the send and return hoses are different sizes.
You can re-use the hose fittings if they have already been replaced with
metal items, although you may want to put new o-rings on.
Here are the part numbers for everything:
- LC23004 - 1/4 Hose Barb Non-Valved Elbow Coupling Insert
- LC23006 - 3/8 Hose Barb Non-Valved Elbow Coupling Insert
- LCD10004BSPT - 1/4 BSPT Valved Coupling Body (you'll need two of
these)
I used plumbing tape to help seal the threads (some interwebs say yea,
some say nay, use your own judgement). You do not want to screw the new
fittings all the way into the tank; you'll strip the threads. BSPT
threads are designed with a taper (hence the name) that increases toward
the base, sorta like a wine cork with threads. Screw it in tight enough
to seal, no more. You will have to disassemble the locking mechanism if
you want to use a deep socket. The arrow below shows the hole where the
spring and plunger go.
Once tightened, reassemble the locking mechanism and you're finished
with the tank.
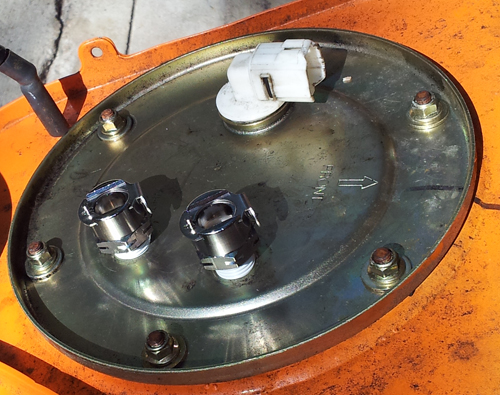
If you're putting on new hose fittings, do that. Note how the top hose
(3/8") is larger than the bottom (although both use the same size insert
for the coupling with the tank fitting).
Before reassembly, I used some hi-viz orange duct tape to mark which
hose went to the "red" fitting. Make sure you plug the right hose into
the right fitting.
That's it. Reassemble. Refuel. Ride.

Return home